Wednesday, 18 April 2012

Chocolate Éclairs


Bonne Anniversaire Maman!

Today was my mummy's birthday and her favourite indulgence is chocolate éclairs. So it obviously follows that that is what I am baking for her. Unfortunately, she has the pleasure of working on her birthday and at her work, if it is your birthday ... you bring the cake! So yesterday, the marathon of baking commenced! I made cakes all from the perfect bake Lemon Drizzle CakeBrownies, Flapjacks and an upcoming post perfect bake of  Raspberry Cupcakes and of course the chocolate éclairs. With final exams coming up and a tricky essay on my hands, what else is there to do other than spend the day baking ...

Éclairs are all about the choux pastry. Choux pastry is a light pastry dough which has a high moisture content in the dough creating steam inside the dough when cooking, which when cooked forms a hollow shell ready and raring to be filled with a good dose of cream! Choux pastry can also be used to make profiteroles, it is just piped out differently. As long as the recipe is strictly followed, you should make perfect choux pastry every time.

Makes 14 éclairs
Pre-heat oven to 200°C
Bake to Perfection for 35 minutes

You will need the following:
Choux Pastry
150ml Cold Water
50g Butter
65g Plain Flour
2 Eggs, lightly beaten

Filling
400ml Double Cream
100g Plain Chocolate

Method:
Sift the flour into a bowl

Put the butter and water into a pan and heat gently until the butter has melted

Then bring to the boil

Remove the pan from the heat & immediately tip the flour into the water and butter. Beat in thoroughly with a wooden spoon

Beat the mixture until it is smooth and forms a ball in the pan
NB: DO NOT over beat the mixture or  it will become fatty and won't bake properly
Leave the mixture to cool for 2 minutes

Whilst the mixture is cooling, in a separate bowl lightly beat the eggs together
just enough for them to combine

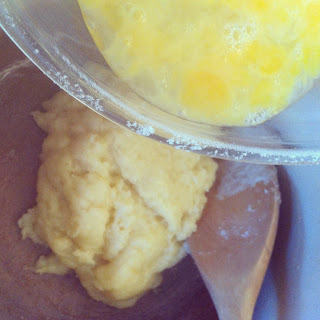
Pour the eggs into the dough mixture a little at a time beating the mixture vigorously
It is important to beat the mixture vigorously in order to trap the air in the mixture

It should get to a piping consistency & an obvious sheen will appear to the mixture

Spoon the mixture into a piping bag fitted with a plain large nozzle
Twist the end of your baking bag so there is no air in with the mixture, this will make your life easier when piping
Onto a dampened baking sheet pipe strips that are roughly 8-10cm long


Nifty tip: Using your finger smooth over the piped mixture with some water, this will ensure you have a smooth perfect choux case

Bake in the oven at 200°C for 20 minutes
After 20 minutes turn the temperature down to 180°C and bake for the remaining 15 minutes

Remove from the oven and immediately pierce a hole at the end of each pastry to let out the steam
Leave them to cool completely

Whip the cream with an electric hand whisk, it will turn quickly so keep your eye on it! 
You'll be looking at roughly 1 minute (high setting) give or take a bit depending on how fresh your cream is


Fill your piping bag with the whipped cream
Using the hole that you made to let out the steam, make it slightly bigger with a skewer
Fill with cream, just squeeze until it fills up

Melt you chocolate in the microwave for 1 minute
Spread over the top over the pastry shell with a spoon

Leave to cool for as long as you can resist and then scoff!!

Enjoy...

Friday, 13 April 2012

The Golden Rules of Baking Cakes ...


The things you ought to know when it comes to baking cakes ... This is something that I should have written at the very beginning.You can have the perfect recipe and baking time but if you fudge up a few fundamentals all can go wrong. I was prompted to write this post when a friend was informing me about her mother's delight at the burnt overspill from The Perfect Bake's Banana Bread that she was kindly making for her father's birthday. This small oversight was entirely my fault, for which I apologise. However, follow these golden rules, along with The Perfect Bake recipes & you shall not fail!

The Golden Rules of Baking Cakes

1. When I say pre-heat, you need to give it at least 20 minutes: if you don't, your cooking time won't be correct and you could end up with a under baked cake

2. Room temperature: try and get your butter & eggs (if you keep them in the fridge) out before you bake. Trust me, it makes it easier to cream the butter and the eggs disperse through the cake mixture better and provide a more even bake 

3. Its all about your mixture: when you mix together your ingredients do so with care. Over mixing cake knocks all the air out of it & over works the flour resulting in a dense, poorly risen cake, not ideal! So when it comes to cakes:

  • Cream your butter well
  • When you add in your sugar, eggs & flour stir enough just so they combine, do not excessively mix

4. To sift or not to sift ... It isn't the end of the world if you don't sift your flour when making a cake. It is just beneficial two-fold: makes it easier to stir out the lumps of flour when combining & if you have old flour that's been sitting in your cupboard it is possible that you will have flour bugs (weevils).

5. Two-thirds full ... Never more, never less! When you fill a tin or cupcake case with mixture always fill it two thirds full. Over fill and your cake will spill over whilst baking creating a great mess and a flat cupcake or cake, under fill & your cake will dry out when baking and be over cooked 

6. Always lightly grease your tin: you will be incredibly stressed trying to get it out of the tin when baked if you don't!

7. Ready or not ... Check your cake at the stated time with a wooden skewer, if it comes out clean your cake is done. If there is still cake mixture on it give it another 2 minutes

So, follow these Golden Rules & The Perfect Bake cake recipes, you should have a fab cake ready for demolition!

Friday, 6 April 2012

Hot Cross Buns


Coming home I was enlightened by my mother that it was Good Friday and this was the day to eat hot cross buns. The cross symbolises the crucifixion don't you know!! In accordance with my mantra (bake don't buy) I persuaded my mother it would be fun to have a go at baking some. So, in a break of tradition where my recipes that I usually post on The Perfect Bake are tried and tested recipes, I am going out on a limb and sharing a recipe with you that I have never tried! However, I have played it safe with a little number from Delia. Trustworthy, always. 

Stick with the steps, there are lots of them & all worth it! Better than any shop bought hot cross buns I've ever tasted ...
"these aren't just any hot cross buns, these are home made perfect bake 
(with a little help from delia) hot cross buns!"

Makes 12
Pre-heat the oven to 220°C
Bake to Perfection for 15 minutes

You will need the following: 
Buns
 450g Plain Flour 
50g Caster Sugar & 1tsp more 
1tbsp Dried Yeast 
1tsp Ground Mixed Spice
1 pinch of salt

75g Currents
50g Mixed Peel 
50g Butter, melted
45ml Milk, warmed 
1 Egg, beaten

Crosses
110g Plain Flour
4tbsp Water

Glaze
2tbsp Caster Sugar
3tbsp water
Zest of 1/4 of an orange
Method: 
Measure out150ml of hand hot water & dissolve the 1tsp of caster sugar
(run the hot tap for a bit & that will be the right temperature)

Next add in the yeast into the dissolved sugar mix

In a bowl, mix together the flour, currents, peel, caster sugar, mixed spice & salt

Make a well in the middle of the flour mix & pour in the yeast mixture

Next add in the warm milk

Slightly fold the mix together and then add in the melted butter & beaten egg

Mix until combined

Lightly flour a surface

Next you must knead the dough. Put the mix on the table and push down with palm of your hands first, push the dough forwards & then pull it back together. 

Here is a short clip on what kneading dough is ... not sure how well I explained it above but hopefully you get the gist of it!


 Repeat this folding the dough back over itself until a smooth ball is formed
(This will take roughly 6 minutes)

Lightly oil a strip of cling film comme ci
(this is so when the dough rises it does not stick to the cling film)

Place the dough back in the bowl & cover in the lightly oiled cling film 
Leave to rise for 1 hour in a warm place 

Line two baking trays with grease proof paper

After 1 hour ...

Split your dough ball in half 

Roll the two halves into log shapes & score into six equal pieces

 Cut the dough into six

Roll the dough pieces into small balls 

Next to ensure the hot cross buns are circular shape the sides in your hands like so ...

Place the buns on the two trays 
(six per tray)

Score each bun with a deep cross, cover again with lightly oiled cling film 
(using the same technique as above)

Leave  to rise for 25 minutes 
At this point pre-heat the oven to 220°C


Whilst the buns are rising make the mix for the crosses with the flour & water

Roll out the mix to roughly 2mm thick (so actually rather thin!)

Cut into strips roughly 1/2cm wide

Dip in water and lay on the buns where the scored crosses are  

& Ta Daa ...

Bake to perfection for 15 minutes

Whilst they are baking it is time to make the glaze ... the secret to the shiny-ness!! 
Dissolve the sugar in the water & add in the orange zest

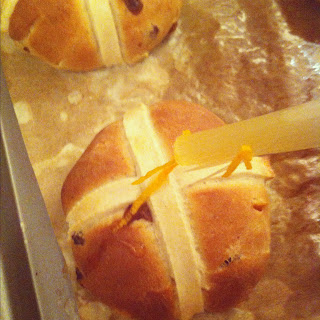
After 15 minutes take your buns out of the oven & immediately brush the glaze over the buns

Et voilà ... something rather special for Easter

  Best enjoyed hot with lashings of butter & the jam of your choice ... 
I toasted mine & was in an indecisive mood so went for two varieties of jam

Raise your game & make your own hot cross buns this Easter Weekend ... 
I'm sure no one will mind that you are enjoying them post Good Friday! 

Enjoy ...